We love autumn!! I guess you can tell))) This wall pocket container turned out so gorgeous, we're all fighting over who gets to take it home!
The supplies for this arrangement will be available in a kit (while supplies last). Even after the kit and/or individual supplies have sold out, we will continue to leave the tutorial up, as the basic instructions can be followed and other products chosen.
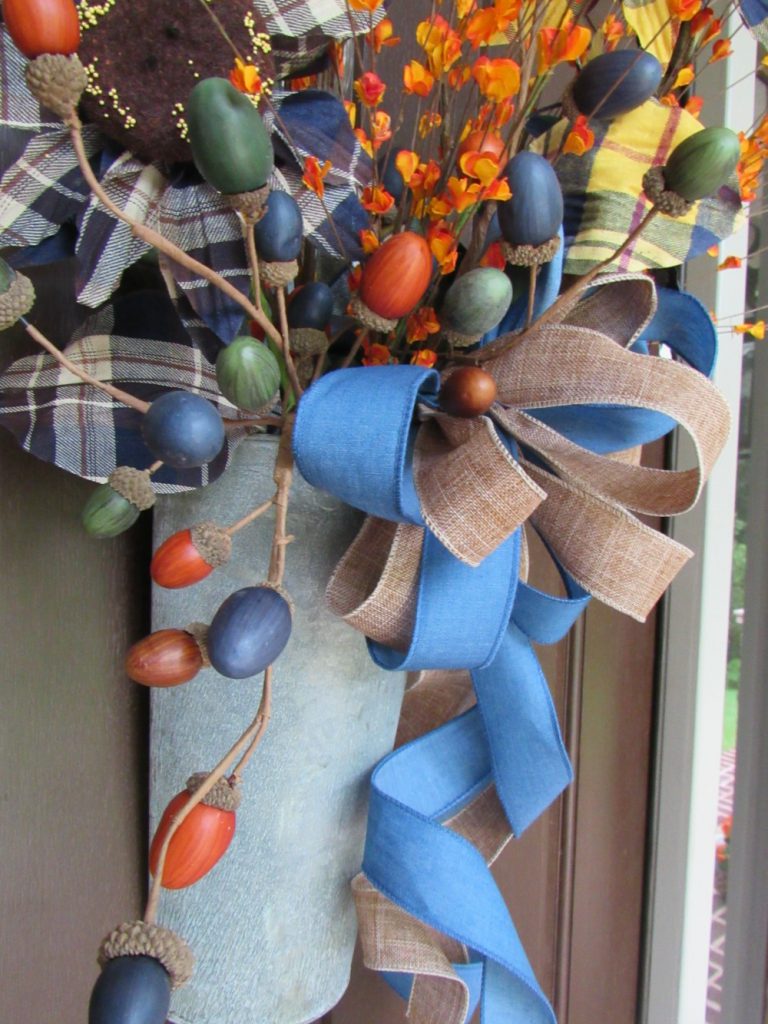
Purchase kit here: 2017 Autumn Door Floral KitSupplies:KK9374M-GB French Wall Bucket
F3706747 RAZ Plaid Sunflowers Set of 3
F3706743 RAZ Acorn Spray - 3
F3602394 RAZ Bittersweet Bundle
ZXP-TT01 1.5" Faux Burlap Ribbon
RG181014 1.5" Denim Ribbon
10/29/17 Update: Kit containing all the products for this project has sold out, but some of the individual products may still be in stock.Summary:French Wall Bucket: The French Wall Bucket measured 18" in height; the bottom was about 3.5" and the top opening about 7" It's made of metal of course. Rachel placed a couple of chunks of Styrofoam in the contained and push it down in there very snug. She did not have to use any hot glue or anything.
We don't sell Styrofoam on Trendy Tree, but here's our affiliate Amazon link for a piece that is 18" x 12" x 2". This large piece of Styrofoam is economical in that you can just cut off the size piece that you need. Rachel snapped off two pieces to put down in the contained. She just scored it and put it on the table with the end hanging off and snapped it off by hitting with her hand. It makes a LOUD noise, so we left this out of the video))
The container is rounded on the front and flat on the back so it will fit nicely on your door or wall. You could always use some felt pads on the back to keep it from scratching your wall or door. You can find those at WalMart or craft stores in the picture hanging section or those stick on felt pieces used for cabinet doors.
A hanger for the wall bucket was fashioned out of a chenille stem, but you could also use floral wire. There is a small hole at the top of the container, but it's not large enough to hang on anything unless it was to hang on a nail or screw.
RAZ Plaid Sunflowers: Rachel started with the RAZ Sunflowers. The sunflowers are new for this year and come from the RAZ Camp Harvest Collection.They are bright and bold plaid in fall colors of yellow, blue and dark green. The sunflowers are about 20" in length and made of Polyester.
Rachel started with one of the sunflowers and trimmed off the ends as needed with wire cutters. The three sunflowers were positioned in the container first. No hot glue was used, they were just pushed down into the Styrofoam.
RAZ Acorn Sprays: The RAZ Acorn Sprays are also new for this season and come from the Camp Harvest Collection also. They are stunning sprays with their colorful acorns of orange, brown, green and blue.
They measure about 28" in length and all the pieces are wired so you can manipulate them and shape as you please.
Rachel placed one of the sprays toward the back and another to the side. The third spray was not placed until the end.
Bittersweet Bundle: The RAZ Bittersweet Bundle came out last year and was very popular so it was brought back again this year. We also have a Bittersweet Spray and Garland all from this same Camp Harvest Collection. The bundle is actually made up of four pieces that can be separated.
Rachel and Carrie separated these and cut off at varying lengths to use as filler for the arrangement. After the last piece of the Bittersweet Bundle had been placed, they placed the third acorn spray off to one side, opposite of where the bow was going to be attached.
Bow: Two different ribbons were used for this arrangement, both solid colors. The first was a 1.5" Faux Burlap and the second was a 1.5" Blue Denim. Solid colors were chosen since the arrangement already had a bit going on with the plaid sunflowers.
Rachel started out by measuring about 30" of ribbon (both at the same time) and made a 6" loop, holding the ribbon in her hand. She continued to make 6" loops until she had a total of 6 loops. She then cut the ribbon off leaving the same about of tails that she started with.
Bows can be made any number of ways, so just make a bow the way you are most comfortable with. Both these ribbons are wired which makes the shaping easier. She used a piece of straight floral wire to secure the bow, and then she took a 6" floral pick, wrapped the wire from the bow around the pick and inserted the bow into one side of the container (that last acorn spray was positioned off the other side).