2017 Autumn Denim Wreath with Butterflies Tutorial
New autumn wreath tutorial! These RAZ Butterfly sprays really add a pop of beautiful orange colors.
Supplies:XX7504W4 24 Burlap Pencil Wreath
XB96610-27 10" Denim Champagne Mesh - 2 rolls (Sold out)F3602394 RAZ Bittersweet Bundle (Sold out)F3706729 RAZ Butterfly Spray - 7 sprays (Sold out)
C1740005 2.5" Copper Squares Ribbon - Sold out
C1640285 2.5" Ivory with Copper Dots Ribbon C1640285 - Sold out
X740809 1.5" Fall Linen Ribbon -Sold out (Kits have sold out, no more will be available, but some of the individual supplies will be available and potential substitutes listed below)Possible Substitutes:XX7488W4 24" Burlap Work Wreath
XB96410-05 10" Denim Ivory Mesh)
F3606769 Bittersweet Berry Spray
RG0101952 2.5" Copper Metallic Ribbon
RG0101352 2.5" Copper Metallic Ribbon
C1740012 2.5" Copper Metallic Stripe Ribbon
X722240-31 2.5" Copper Satin Damask Rust Ribbon
ZXP-TT02 2.5" Fall Check Ribbon
X713609-49 1.5" Golden Wheat Ribbon
ZXP-TT01 1.5" Faux Brown Burlap
Summary:24" Pencil Wreath - We used a burlap pencil wreath for this project, but you could use a burlap work wreath, or other colors. The wreath form we used the video has obviously been used many times))) When we do a tutorial, we make things, take them apart and re-use the supplies. A 24" wreath measures 15" across the widest ring, but with the addition of mesh, ribbons and other products, you wind up with a finished wreath 24" or wider.
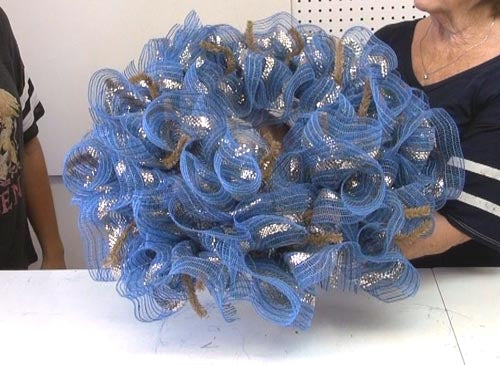
Mesh: The mesh we used for this project was a denim with champagne foil stripe. It was 10" in width and 10 yards in length. We did the ruffle technique. A 24" wreath has about 18 twists and to do the ruffle technique, we cut pieces of mesh 10" in length to make one ruffle.
A cluster of three ruffles was placed in each twist. To do the math, this would typically take 54 pieces of mesh. Most of the time you can get 36 pieces off one roll of 10" x 10 yards. Sometimes you might only get 35 and other times you might get a little more. So it takes more than one roll, but not all of the second roll. You could also use other colors of mesh for this project.
Once we do a tutorial, many times the exact item we used sells out. For instance if this mesh sells out, you can use another color of 10" mesh, or if you want denim with champagne stripes, and the 10" is sold out, we may have some of the 21" Denim Champagne Stripe left in the same style. We do not recommend cutting a 21" product to make 10" x 10" ruffles. The more cut edges you have, the more raveling you have. If you had to go with 21" mesh, just do a pouf technique instead of ruffles.
To cut the mesh, since we were using two rolls of the same color, we cut the mesh two pieces at a time.
To cut our mesh we use a self-healing cutting mat and rotary cutter. If you don't have these two tools, you might want to consider purchasing them. They are great time savers.
The cutting mat has measurements on it and the rotary cutter is quick and easy. You can buy extra blades when they get dull.
We used to sell both these items on Trendy Tree, but just can't compete with Amazon so we'll give you our affiliate link for these. The blades on the cutter are very sharp, so be careful! We've been cutting with ours now for several years and have only changed the blade once, so they do last a good while. Course we're not making wreaths everyday like some folks, we're only doing the occasional tutorial. But extra blades can be purchased also.
To make a ruffle, leg the piece of mesh roll up naturally on the table, flatten it out and starting at the cut edge, scrunch up or gather up through the center of the 10" piece, have the selvage or un-cut edges to the outside.
Once you have your ruffled pinched, make three ruffles and hold them in your hand not stacked right on top of each other, but angle them as you hold them. Secure the cluster of three ruffles into a twist. We started on the outside and secured a cluster of three ruffles in each twist.
Just continue working around the outer ring, then move to the inner ring and continue with a cluster of three ruffles in each twist.
Butterfly Spray: The butterfly sprays are actually a RAZ Halloween product, but the orange was so vibrant we wanted to try them on this wreath. The sprays measure about 17" which really makes it a good length to work with. We didn't cut these sprays, but you could if you wanted to. We took seven of the sprays and placed three around the inner ring and four around the outer ring. Right now we have kits that contain the butterfly sprays, but we have more on order that will be arriving any day now too.
We just worked our fingers down to the twists on the inner ring, opened a twist and secure the spray by tucking the end of the spray to the inside of the wreath. We secured each spray in two places with the twists. It's import to un-do a twist, make sure your ruffles stay in place, lay the spray in, and then re-secure with 3-4 turns.
Once all the sprays are secured, flip the wreath over the back and secure any of the long ends sticking out with zip ties. Snip off the ends of the zip ties with wire cutters, not your scissors. Turn any rough edges of the zip ties toward the inside of the wreath so they don't scratch your door.
Sometimes, especially if your twists have become loose on your wreath form, the bundle of ruffles tend to roll toward the back of the work wreath frame. To help keep this from happening, you can take the twists from the outer ring and find the twist closest to it from the inner ring. Twist those together and poke to the inside. This will get your twists out of sight if you don't want them to show and will help keep your outer ruffles from slipping to the back. Course once you hang it on the wall or door, they won't move. You can push ruffles that roll to the center, outward from the back of the wreath.
Bittersweet Bundle: The bittersweet bundle is actually four sprays held together with raffia and paper tape. We just removed the raffia and paper tape and separated them out. Once the Bittersweet Bundles are sold out, we also have a Bittersweet Berry Spray that would work just as well, it's just a little more expensive, but larger.
We separated the bittersweet bundle and position them three up and one down. We cut about 6" or so off the ends of the spray. You can hold these on the front of the wreath and decide what length you want your bundle. Once the length was settled, with three sprays up and one spray down, we zip tied the sprays back together as a bundle. You might want to try two sprays up and two sprays down, just whatever your preference is.
Bow: Next we made a 12" bow to attach to the bundle right in the area where the zip ties had been placed to put the bundle back together again. We chose three ribbons, two 2.5" and 1 that was 1.5" in width. We cut 30" strips from each roll of ribbon, about four pieces from each roll.
Alternating the pieces of ribbon, we picked up a ribbon and made a 6" loop, holding it pinched with a tail to the back and tail to the front. Make sure your tails all stay face up. Just keep picking up ribbon and making loops, alternating the size and style of ribbon. It can be quite a handful to hold so if you haven't made a lot of bows, you might want to practice with fewer loops and some old inexpensive ribbon.
Keep trying to hold your tails separate as you can, one to the back and one to front. After you have all the loops in your hand, take a zip tie and secure around the neck of the ribbon were you have been holding it pinched together. Before you pull the zip tie tight, slip a chenille stem, or piece of long floral wire under the zip tie. Then pull the zip tie tight as you can and snip off the tail. Keeping your back tails separate, slip the chenille stem under those back tails and twist it again. This will help keep the back tails up.
You can always make another style of bow, whichever is easiest for you.
Using the chenille stem, secure the bow to the bittersweet bundle in the area where you had applied the zip ties to the bundle. Find your placement on the front of your wreath and secure the bundle/bow directly to the work wreath frame, You may have to find your position from the front, and reach your hands to the back to be able to secure the chenille stem. If your bundle wants to flop out at the top, just take a piece of floral wire and secure it in another place to the work wreath frame.
Always check the back of the your wreath for any sharp edges and clip your strings. Clip rather than pull strings. All mesh ravels and you will always need to clip strings. We have experimented with Elmer's Craft Bond Spray Adhesive and this has helped on some products to reduce the raveling. But always test on your particular mesh before spraying a whole wreath. We didn't use it on this tutorial, but if we had, we would have sprayed the ruffles once they were all attached. Spraying the the adhesive product will cause the ruffles to be sticky and you have to gently lift them out to separate and this also will cause some raveling, but when it dries, it does seem to help. Again, climates vary and a product that might work well in Mississippi....might not work for you so test! test! test!
Happy fall y'all!
(post contains affiliate links)
SaveSaveSaveSaveSaveSaveSaveSaveSaveSaveSaveSaveSaveSaveSaveSaveSave


 To cut our mesh we use a

 Once you have your ruffled pinched, make three ruffles and hold them in your hand not stacked right on top of each other, but angle them as you hold them. Secure the cluster of three ruffles into a twist. We started on the outside and secured a cluster of three ruffles in each twist.
 Just continue working around the outer ring, then move to the inner ring and continue with a cluster of three ruffles in each twist.
 Butterfly Spray: The butterfly sprays are actually a RAZ Halloween product, but the orange was so vibrant we wanted to try
 Once all the sprays are secured, flip the wreath over the back and secure any of the long ends sticking out with zip ties. Snip off the ends of the zip ties with wire cutters, not your scissors. Turn any rough edges of the zip ties toward the inside of the wreath so they don't scratch your door.
Sometimes, especially if your twists have become loose on your wreath form, the bundle of ruffles tend to roll toward the back of the work wreath frame. To help keep this from happening, you can take the twists from the outer ring and find the twist closest to it from the inner ring. Twist those together and poke to the inside. This will get your twists out of sight if you don't want them to show and will help keep your outer ruffles from slipping to the back. Course once you hang it on the wall or door, they won't move. You can push ruffles that roll to the center, outward from the back of the wreath.
Bittersweet Bundle: The bittersweet bundle is actually four sprays held together with raffia and paper tape. We just removed
Once all the sprays are secured, flip the wreath over the back and secure any of the long ends sticking out with zip ties. Snip off the ends of the zip ties with wire cutters, not your scissors. Turn any rough edges of the zip ties toward the inside of the wreath so they don't scratch your door.
Sometimes, especially if your twists have become loose on your wreath form, the bundle of ruffles tend to roll toward the back of the work wreath frame. To help keep this from happening, you can take the twists from the outer ring and find the twist closest to it from the inner ring. Twist those together and poke to the inside. This will get your twists out of sight if you don't want them to show and will help keep your outer ruffles from slipping to the back. Course once you hang it on the wall or door, they won't move. You can push ruffles that roll to the center, outward from the back of the wreath.
Bittersweet Bundle: The bittersweet bundle is actually four sprays held together with raffia and paper tape. We just removed
 Bow: Next we made a 12" bow to attach to the bundle right in the area where the zip ties had been placed to put the bundle back together again. We chose three ribbons, two 2.5" and 1 that was 1.5" in width. We cut 30" strips from each roll of ribbon, about four pieces from each roll.
Alternating the pieces of ribbon, we picked up a ribbon and made a 6" loop, holding it pinched with a tail to the back and tail to the front. Make sure your tails all stay face up. Just keep picking up ribbon and making loops, alternating the size and style of ribbon. It can be quite a handful to hold so if you haven't made a lot of bows, you might want to practice with fewer loops and some old inexpensive ribbon.
Bow: Next we made a 12" bow to attach to the bundle right in the area where the zip ties had been placed to put the bundle back together again. We chose three ribbons, two 2.5" and 1 that was 1.5" in width. We cut 30" strips from each roll of ribbon, about four pieces from each roll.
Alternating the pieces of ribbon, we picked up a ribbon and made a 6" loop, holding it pinched with a tail to the back and tail to the front. Make sure your tails all stay face up. Just keep picking up ribbon and making loops, alternating the size and style of ribbon. It can be quite a handful to hold so if you haven't made a lot of bows, you might want to practice with fewer loops and some old inexpensive ribbon.
 Keep trying to hold your tails separate as you can, one to the back and one to front. After you have all the loops in your hand, take a zip tie and secure around the neck of the ribbon were you have been holding it pinched together. Before you pull the zip tie tight, slip a chenille stem, or piece of long floral wire under the zip tie. Then pull the zip tie tight as you can and snip off the tail. Keeping your back tails separate, slip the chenille stem under those back tails and twist it again. This will help keep the back tails up.
You can always make another style of bow, whichever is easiest for you.
Using the chenille stem, secure the bow to the bittersweet bundle in the area where you had applied the zip ties to the bundle. Find your placement on the front of your wreath and secure the bundle/bow directly to the work wreath frame, You may have to find your position from the front, and reach your hands to the back to be able to secure the chenille stem. If your bundle wants to flop out at the top, just take a piece of floral wire and secure it in another place to the work wreath frame.
Always check the back of the your wreath for any sharp edges and clip your strings. Clip rather than pull strings. All mesh ravels and you will always need to clip strings. We have experimented with Elmer's Craft Bond Spray Adhesive and this has helped on some products to reduce the raveling. But always test on your particular mesh before spraying a whole wreath. We didn't use it on this tutorial, but if we had, we would have sprayed the ruffles once they were all attached. Spraying the the adhesive product will cause the ruffles to be sticky and you have to gently lift them out to separate and this also will cause some raveling, but when it dries, it does seem to help. Again, climates vary and a product that might work well in Mississippi....might not work for you so test! test! test!
Keep trying to hold your tails separate as you can, one to the back and one to front. After you have all the loops in your hand, take a zip tie and secure around the neck of the ribbon were you have been holding it pinched together. Before you pull the zip tie tight, slip a chenille stem, or piece of long floral wire under the zip tie. Then pull the zip tie tight as you can and snip off the tail. Keeping your back tails separate, slip the chenille stem under those back tails and twist it again. This will help keep the back tails up.
You can always make another style of bow, whichever is easiest for you.
Using the chenille stem, secure the bow to the bittersweet bundle in the area where you had applied the zip ties to the bundle. Find your placement on the front of your wreath and secure the bundle/bow directly to the work wreath frame, You may have to find your position from the front, and reach your hands to the back to be able to secure the chenille stem. If your bundle wants to flop out at the top, just take a piece of floral wire and secure it in another place to the work wreath frame.
Always check the back of the your wreath for any sharp edges and clip your strings. Clip rather than pull strings. All mesh ravels and you will always need to clip strings. We have experimented with Elmer's Craft Bond Spray Adhesive and this has helped on some products to reduce the raveling. But always test on your particular mesh before spraying a whole wreath. We didn't use it on this tutorial, but if we had, we would have sprayed the ruffles once they were all attached. Spraying the the adhesive product will cause the ruffles to be sticky and you have to gently lift them out to separate and this also will cause some raveling, but when it dries, it does seem to help. Again, climates vary and a product that might work well in Mississippi....might not work for you so test! test! test!
 Happy fall y'all!
