New Scarecrow swag tutorial. This one is a little different, no ribbons, but lots of colors with the sunflowers.
SuppliesXX759938 Copper Straight Rail
MTH11920 Scarecrow (available in wreath kit only - but other scarecrow pieces are available)
RY800985 10" Natural Chocolate Copper Poly Jute Mesh
RE3221CC Snowdrift Flex Tubing Natural/White
SB780152-005 Sunflower Bush
Note: We will have a limited number of kits that contain all the supplies, but even after the kits have sold out, we will leave this tutorial up since you can follow the basic directions and choose other products for a similar look.
8/26/17 Update: Sorry - Kit has sold out and no more will be available. Summary:
Straight Rail: A Copper Straight Rail was chosen for this project, but you could use burlap or chocolate color too. The ties on a straight rail are of the "pencil" fashion which just means the ties are smaller. There is 11 ties around a round typically. The ties are staggered around the rail and sometimes when working with a rail you need to add an extra tie at the top and/or bottom to even things out.
We didn't add anything extra to this rail since the head would be at the top and any unevenness would not show.
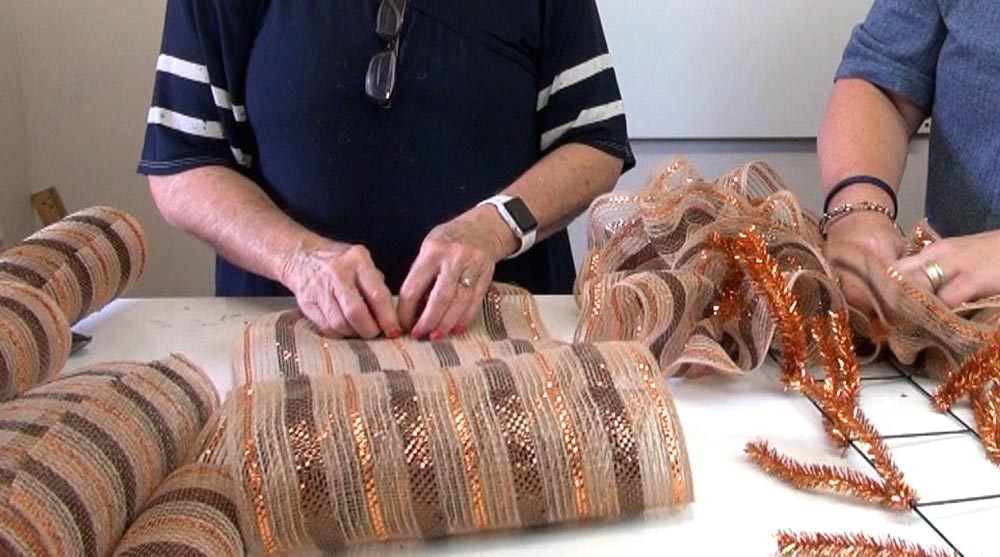
Jute Mesh: The mesh we chose for this project is a new combination mesh, it contains 63% Polypropylene and 37% jute. This combination give the mesh a nice texture and more thickness than just plain poly mesh. Also the foil strips are wide so the copper and chocolate foil strips show up nicely.
The mesh is 10" in width and 10 yards in length. Also, you could use any number of styles of mesh for this project, just stick to a 10" product and pick out a style or color that you like.
We made this project using the ruffle technique. Typically in the past, we have made three ruffles 10" in length, but we watched Lori "Hard Working Mom" do a tutorial and she made her ruffles 30" in length to help reduce the raveling. This seemed like a great idea and it is! We cut the pieces of mesh 30" in length. I apologize for the still images in this post. I had to go back and grab them from the video so they aren't the clearest images.
The tools that we are using in this image is a self-healing cutting mat and a 60mm stick cutter. These are great tools for working with mesh. The self-healing mat is reversible and has measurements on it and the stick cutter and zip through 2-3 layers of mesh at a time.
The cutter also has a replaceable blade that can be changed when it becomes dull. We used to sell both these items on the website, but for now, we're just listing our Amazon affiliate links in case you are interested.
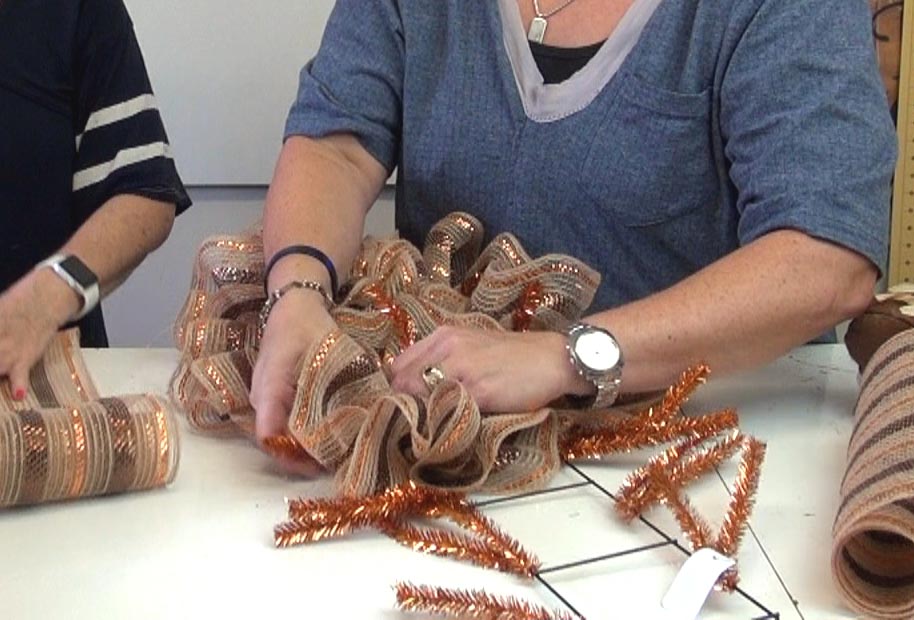
To make the ruffle, just let the mesh roll up naturally on the table, smooth it out, and starting at the cut edge center, scrunch up or gather up through the middle making a ruffle. Selvage (uncut edges) should be to the sides.
You will still have some strings that you will have to snip at the end. It's better to clip strings rather than pull. All mesh ravels, no matter what you do, but the less you can handle it and the less cuts you have will help. These 30 pieces really do help. It makes for a pretty bulky ruffle, but the look is great. Just be sure to secure it well in the twist.
It doesn't matter which twist you start on for this project. Just secure a ruffle in each twist working around the rail.
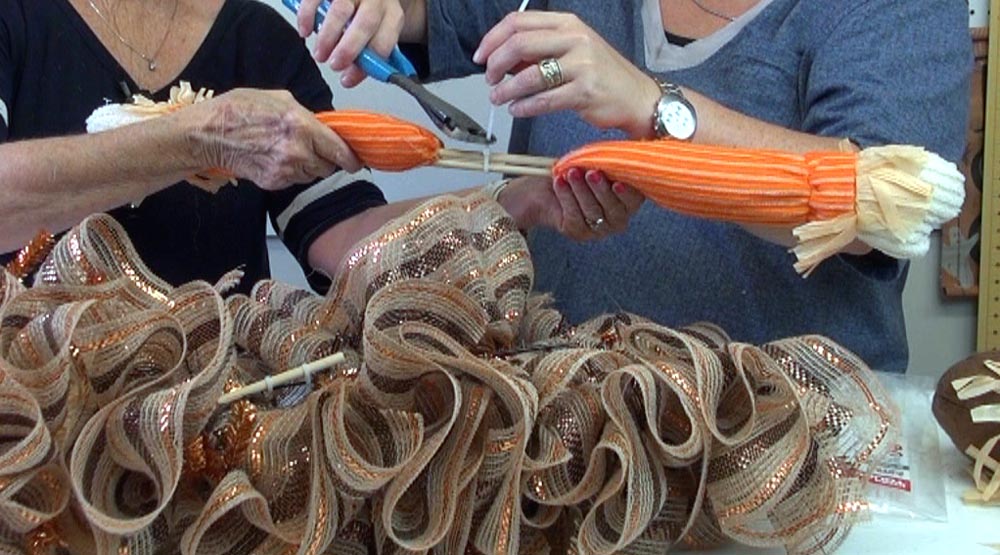
Scarecrow Pieces: The scarecrow has a head, arms and legs. The pieces are not wired for shaping. The has two wooden dowels that you can use to attach to the rail.
You may want to hang the rail up to decide on placement of the parts.
We inserted the head into about the third block of the rail and secured the dowels to the frame with zip ties. We used two on each dowel.
Next, to attach the arms, the first thing we did was secure the arms together with a zip tie. You may want to get an idea of how far the arms are going to stick out before attaching to the rail to make sure they aren't too wide for your door. If they look a little wide, just overlap them a bit. We overlapped these about 1-1.5".
We placed the arms on the back of the rail and secured in about the same area where the head was attached, but you can just experiment with placement. If you wanted to make the arm and legs flexible, you could remove the sticks from the arms and insert some sturdy wire about the gauge of a coat hanger. The wire needs to be heavy enough to hold the shape. You might have to cut the fabric a little to remove the stick, but you could always close the hole on the ends of the arms with a little bit of floral wire.
The hanging legs are held together with a clear thin piece but this is not sufficient to use to attach the legs to the frame, it's just to hold the legs together in the packaging. We ran a piece of paddle wire (florist wire) through the backs of both legs and secured them together and attached to the rail as one piece. The legs were poked in from the front of the swag and then attached to the metal frame from the back. The legs dangle freely, so it would be easy to run a piece of wire down each leg if desired.
Hang the swag up to check the placement of your pieces and adjust as necessary.
Sunflower Bush and Snowdrift Tubing: The sunflower bush has about 7 blooms and they measure around 4" in diameter.
The flowers were snipped from the bush using wire cutters leaving a stem of about 3" With the swag hanging on the wall, we go a general idea of where we wanted to place the sunflowers, and then moved it back to the table.
Rachel added the sunflowers, but also made a shoestring or simple bow from the Snowdrift tubing. The Snowdrift tubing gave it short of a rustic look since it resembles rope a bit.
She made cut pieces of tubing 36" in length and made a loop or shoestring bow and held it with the sunflower. The snowdrift tubing doesn't contain any wire, and it is stretchy. Be sure not to stretch it when cutting so all your pieces will be the same length.
The sunflower and tubing was attached at the same time, by opening the twist, making sure the ruffle stayed in place, the closing the twist over the sunflower and bow, twisting it 3-4 times. Then she took one of the ends of the twist and wrapped it around the stem of the sunflower for extra security.
You could also use hot glue to add the flowers. Typically when we make a tutorial, we try not to use hot glue since we usually take items apart and reuse pieces at other times. But you could always add a generous amount of hot glue to secure the flowers, or you could leave the stems a little longer and wire them into the straight rail securing with zip ties. If you choose to secure the flowers with zip ties, be sure to leave enough stem on the flower so that when you secure the flower you don't pull it down into the mesh and lose the effect of the nice large bloom. Sometimes people wire the flowers in and use hot glue, just do whichever method you are most comfortable with.
We were thinking that in October if you wanted to convert this rail to a Halloween project, it would be easy to remove the scarecrow pieces and sunflowers and just had something for Halloween.
We used six sunflowers around the body and put the last one on the hat. The hat already had a little bit of decoration on the brim, but the sunflower looked better. We also took placed a small bit of hot glue on the brim of the hat to hold it up out of the scarecrow's eyes.
We choose not to use any ribbon on this project but that's just a preference. If you wanted to use ribbon you could. You could use less of the sunflowers and put a big rounded bow in the middle etc. Another idea Rachel had would be to add some raffia.
Happy Fall Y'all!
Save


 want to hang the rail up to decide on placement of the parts.
We inserted the head into about the third block of the rail and secured the dowels to the frame with zip ties. We used two on each dowel.
want to hang the rail up to decide on placement of the parts.
We inserted the head into about the third block of the rail and secured the dowels to the frame with zip ties. We used two on each dowel.