Sometimes, especially ribbons with wider width, script, or special patterns, you might want the loops of your bow to all be in the same direction. Most of the bows we make are make a loop, twist to get the right side up and make another loop. This works great 90% of the time, but when you twist, the pattern turns upside down. For most ribbons and most bows, this is fine, but occasionally, you want something different. Here's a short video on making a simply bow with the script print all going in the same direction.
Supplies
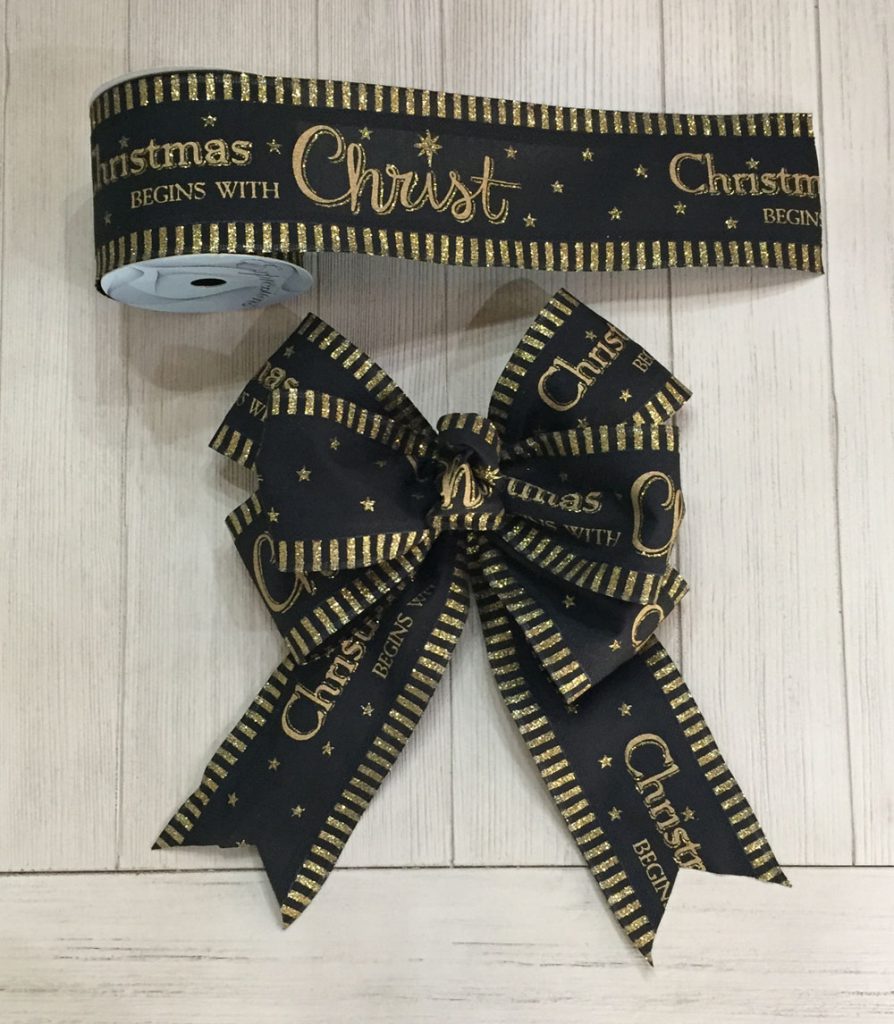
4" Ribbon (this 4" ribbon is sold out, but 2.5" is available)
Bowdabra
Chenille Stem
We did this tutorial using the Bowdabra, but you don't really have to use it, and we'll show you another tutorial making the same bow without the Bowdabra. We don't sell the Bowdabra on Trendy Tree, but we have included an Amazon link for it.
Steps:
We cut our pieces of ribbon first.
2 - 28" pieces
2 - 24" pieces
1- 8" piece
Make a tail using the 24"piece. Finish off ends with a dove-tail type cut. Place this piece of ribbon was placed in the Bowdabra first. With the Bowdabra you are building your bow from the bottom up.
Next, take one of the 28" pieces and overlaps the ends a bit. After overlapping, your folded ribbon should be about 12" in width. Please note that all my measurements are not absolutely exact! They are there about)))
Pinch the folded ribbon in the center and place it into the Bowdabra. Be sure you have your printed side showing and it's in the right direction.
Second & Third Loops
Make a second one using the next 28" piece.
Next, make a third loop using the remaining 24" piece.
To finish off the bow, take the 8" piece, fold it together, not overlapping the ends like the loops above, just put the two ends together. Raw edges on one side. Place that down in the Bowdabra with about 1 1/2" of the raw edge sticking out on the left side and a loop on the right side.
Scrunch down the bow using the Bowdabra tool. You want the center of the bow scrunched down as much as you can. Gently lift the entire bow off the Bowdabra keeping the ribbon layers all stacked on top of each other. You want to keep the straight and stacked. Take a chenille stem, or floral wire and wrap around the stacked layers. The chenille stem should be right on top of the last ribbon you placed, which was raw edges to the left and a loop to the right. Bring the chenille stem around to the bottom of the bow, keeping them all stacked and secure the chenille stem as tightly as you can.
Fluffing
Fluff out the loops starting at the bottom, pull one up toward the top, the other toward the bottom, do the same on the opposite side. Fluff the shorter loop and pull the small center loop over toward the left to get that loop in the center. If the raw edges of that loop are showing, just snip them off a bit closer. Just don't cut them so short that they might pull out.
You can make this bow without the Bowdabra of course, and the video for it is listed below. Make the bow in the same manner, but instead of using the Bowdabra, use a 24" piece of floral wire to attach each loop of ribbon. Watch the video.
Here are some links to more beautiful black and gold ribbons to choose from that would compliment this Christmas Begins with Christ ribbon.
RG0190702 1.5" Black Gold Swiss DotsRG0122686 2.5" Black Gold Bold ScrollQ931640-21 2.5" Black Gold White Stripe
*This post contains affiliate links.