This is a wreath tutorial that we did a couple of years ago. Some of the products will no longer be available, but the gingerbread boy wreath embellishment kit still is. It will be easy to pick out other ribbons and mesh. We'll list some suggestions!
We used a 24″ Burlap Work Wreath for this project, but you could use a pencil wreath of the same size, other colors would work well too.
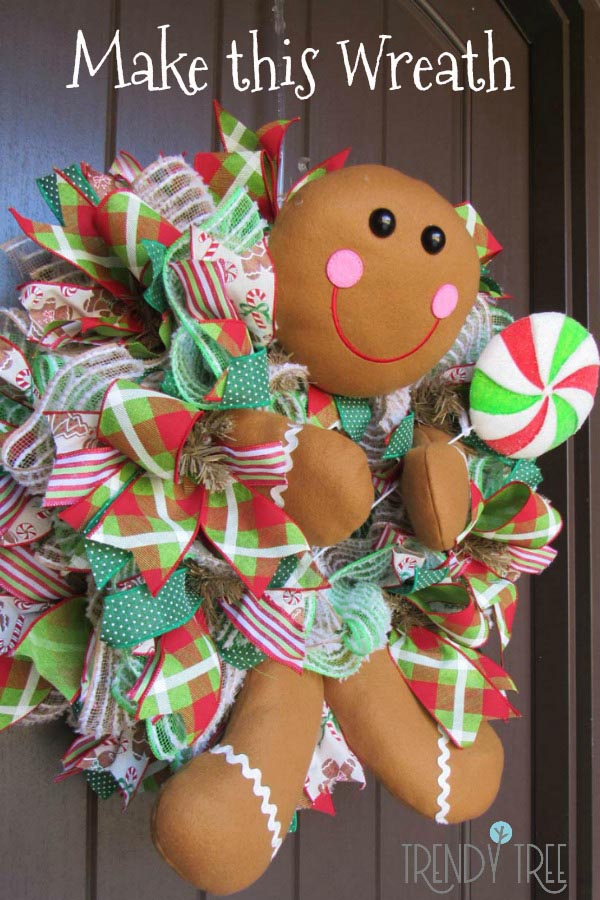
Our 24″ Work Wreath measures 15″ across the widest metal ring. With the addition of mesh, ribbons and other embellishments, you wind up with a wreath that measures 24″ or greater. This wreath measured about 27″
Mesh
We used two different styles of mesh on this wreath, both were 10″ in width and 10 yards in length.
One was a lime/white cotton drift and the other natural/white cotton drift. Cotton drift mesh is made of Polypropylene and Polyester which gives the mesh more density and better coverage.
The ruffle technique was used and we cut 18 pieces of each color mesh, in 15″ lengths. We made ruffles with each piece of mesh and placed two ruffles in each twist.
There are usually 18 twists on a work wreath. We alternated the colors by placing a lime on the bottom, and next time a natural on the bottom. It doesn’t have to be this way….you could just randomly alternate.
Ribbon
Four rolls of ribbon were used. Two were 2.5″ in width and two were 1.5″ in width. All the ribbons were 10-yard rolls.
Ribbon can be applied to a wreath in many different ways. You can do ribbon strips, bows, big bows, loops and tails etc. For this wreath, we cut our ribbon in 12″ lengths.
We finished off the ends of the 2.5″ ribbon with a chevron or dove-tail cut, and on the 1.5″ ribbon, we just cut at an angle. We cut 18 pieces of each color of ribbon to make ribbon clusters.
A ribbon cluster was placed in each twist. After all the clusters had been placed, we cut 22" pieces of the plaid ribbon and made a loop and tails. We had about six of these and just placed them randomly in the wreath using the twist ties.
Again, ribbons can be added in any number of ways, you might opt to just make three large bows with the ribbon. There was extra ribbon left off in all the styles except the plaid which we used up.
Gingerbread Boy Pieces
Find the placement for your pieces before securing. The pieces are made of plush and the mesh will stick to it. Each piece has wires for attaching and you can shape the legs and arms a little if you wish.
Secure the pieces to the work wreath frame or to the twists.
We secured the lollipop to the back of the arm using floral wire also placed a chenille stem around the neck of the lollipop. You could always use a little hot glue too if you like.
Clip your strips and fluff your ribbons. All mesh ravels and you will have some raveling, but really not a lot with this method. The fewer cuts you make in your mesh and the less you can handle it, the less raveling you will have.
I would not recommend splitting a 21″ width of mesh to make 10″ ruffles. It works better to use 10″ wide mesh.
You can make this wreath just using two rolls of the same color mesh and instead of making two 15″ ruffles, you could just cut 30″ pieces. Fewer cuts = less raveling. It doesn’t quite take all of two rolls, but one roll is not enough.
Make a wreath hanger on the back using chenille stems, floral wire or zip ties. It helps if you go ahead and make a hanger before you start placing your gingerbread pieces so you can stay centered.