This tutorial will show you how to make your own Bunny Legs for your Easter wreaths or decorations.
Click here to see the tutorial for the 24" Wreath.
Bunny Legs are in short supply! On our shopping ventures, we're able to find Witch Legs....Elf Legs...Santa Legs....even Scarecrow Legs for this season.....but Bunny Legs are few and far between. We do have one style that should be arriving any day now....but we wanted to try our hand at making some))
Supplies
MG102518 Burlap Garland - 30' Wired
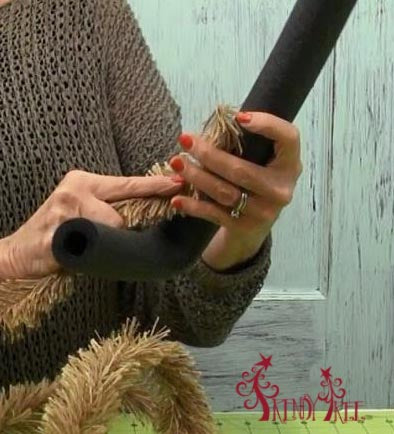
Pipe insulation (purchased at hardware store for $.99 for a 6' length
Wire - any heavy gauge wire will do or even a straightened out coat hanger
First thing we did was cut a piece of the foam insulation about 20" in length.
Cut 20" piece
Next we cut about a 24" piece of wire using wire cutters.
Cut 24" piece
We wanted to have enough wire to go down through the foam insulation without sticking out the end of the tubing, and have enough to make half a loop at the top to use to attach the legs to the wreath. You a wire heavy enough to hold the shape of the foot and a bend at the knee of you want that.
Next we took the Burlap Garland and started covering the leg. On the first attempt that we did with the leg, we covered the foam tubing in white satin ribbon just in case anything showed through the garland, but after that first leg, we decided that this was not necessary so we left this step out.
To start the garland, we placed the end of the garland just above the foot, and held on to that starting point.
Next the garland was brought down around the toe twice, making sure we got the end of the toe covered up well.
The holding the garland in your left hand about the heel, we took the garland to the toe again, and started wrapping around the toe, working toward the heel and up the leg.
You can still see my starting end of garland, and this end will be covered up as we continue to wrap the garland around the toe moving on up the leg.
My garland had been cut into pieces so we had to just add on another a piece of garland keep wrapping.
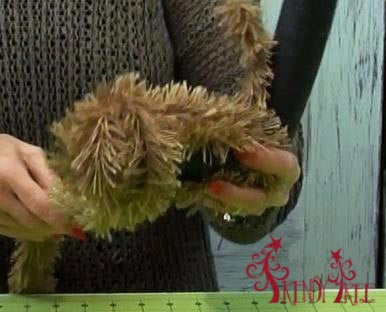
The legs can be bent or shaped into any position. We used the loops at the top of the legs to secure them directly to our Work Wreath frame and just to help keep them in place and not spin around, we also used chenille stems.
You can decorate the leg to make your wreath decorations if you like. We made some ribbon ruffles to go around the ankles to coordinate with our wreath.
To make ribbon ruffles, just choose a wired ribbon. Satin or thinner ribbons are easier to work with. Gently pull the wire from one edge of the ribbon out enough to where you can hold on to it. Then go to the opposite end and pull that wire out a little bit too. Knot or bunch the wire up being sure not to pull it out from the other end.
We used about a 24" piece of ribbon. Pull gently on the wire, sometimes pulling on opposite ends until you have it gathered as much as you like. Then place the gathered ribbon around the Bunny Leg. You can twist the wires together on the back side of the leg and snip off the excess. This raw edge really won't show anyway, but you can also twist the lower edge of the ribbon together by pulling the wire out a little from either end, and twist together.
You can add any may ribbon layers are you like. Here's a close up of our DIY Bunny Legs.
So...hop hop hop on over to Trendy Tree, get your Burlap Garland and get to work!