We used some leftover pieces of sprays to put this small bouquet together. It's a great way to use up those extra pieces. So never throw anything away))) Start a stash somewhere and keep pieces to use for a small project like the bicycle wheel wreath.
Once you have your bouquet assembled, secure it with a zip tie and snip off the end.
Even up the ends of your stems using wire cutters. If your stems are pretty and natural looking, just leave them as is. But if they are not, you can cover them with twine.
We used a ball of natural jute twine, but you could use ribbon or even brown kraft paper.
The images below are from another project, but they give you an idea of how to wrap the stems.
Start by leaving a long tail of twine the longer than the length of the stem you need to wrap.
Hold the cut end of the twine in place (you'll need that cut end to tie off once you get the stems wrapped).
Start by wrapping around the bottom of the stems and work your way up.
You could use hot glue to help, and if I were going to sell this project I probably would. But for my purposes, just wrapping the stems without hot glue works. You can do this fresh stems too. Keep the jute twine close together and wrap over the long piece that you started with.
Once you get to the top of the stems, cut the twine and just tie in a knot. Here's where you need that long piece that you started with. Trim off the knot and you're ready to go!
Your bow will cover up the stems pretty much, but you don't want any plastic pieces showing if you view it from the side, etc.
Secure the bouquet to the bicycle wheel using floral wire, chenille stem or zip tie. Paper wrapped floral wire works well since it tends to hold things in place better and doesn't slip around.
You can buy paper wrapped floral wire. We don't have this on Trendy Tree, but here's an Amazon link: Natural Floral Bind Wire
You may have to secure the bouquet in a couple of places to keep it from falling forward or sideways.
Bow
Hindsight is always 20:20. It would probably be easier to secure the bow to the bouquet before you attach to the wheel.
Make a simple bow either by hand or with the EZ Bowmaker. You don't need a big bow, just a few loops and tails.
Trim the tails to the desired length once you get the bow secured to the bouquet.
Finishing Touches
Make a hanger for the wheel using raffia or the wrapped floral wire. The hanger is going to be visible so you don't want to use your typical chenille stem or zip tie.
You could also make a hanger using a piece of the 1.5" ribbon. But raffia blends in and works well.
Reposition the florals as needed and give the ribbons a little body. Check for anything sharp that might scratch.
See, I told you it was an easy project! I love easy, simple projects. Especially those that use up scrap items!
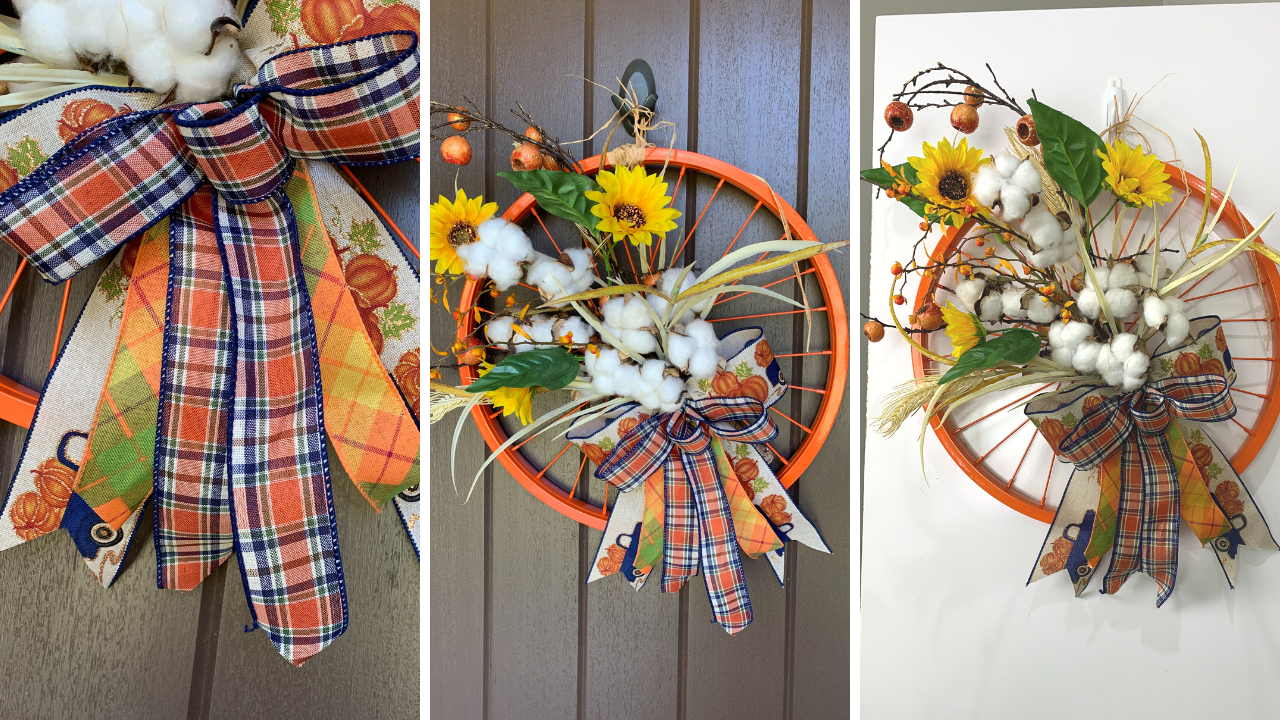
Attaching the bouquet to the wheel in this manner, makes it easy to remove. This same wheel can be used for Halloween. Just remove the fall flowers, and add something spooky!
We have bicycle wheels in several colors and they make a great base for year round wreath decorating.
Thanks for visiting our blog, we appreciate it so much! If you have any questions or comments, just contact us here: Trendy Tree Blog
Here's some links to a couple more fall projects that you might enjoy:
*This post contains some affiliate links which means if you click on them and make a purchase I may receive a very small commission. This commission is a form of advertising for the seller, it is not added to your cost of the product.