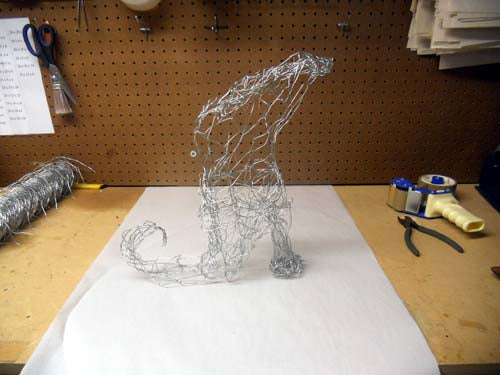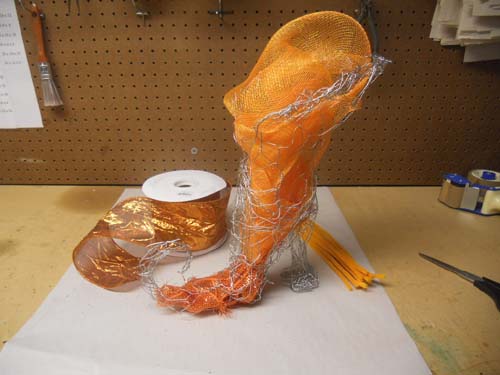
This Witch Boot Halloween decoration was made starting with a form of chicken wire. It was a new project so I experimented along the way!

If you've been following my blog, you've seen me use chicken wire before. And I'm still using off the original $8.00 roll of wire that I purchased a Lowe's. So far I've made two witch hats, a ball and now this boot......still have plenty left! Just roll the wire out on a flat surface and cut a length of about 18 inches. I wear old leather gloves to protect my fingers from sharp points.
I started molding the top of the boot first. Just roll the wire into a tubular shape. I made a v-shape in the front and made the very top of the boot fan out a bit.
Then I cut a smaller piece to shape the foot of the boot. and attached it to the top portion. The heel was made from a third piece. You may have to cut some wires here and there so you can attach them together. Just keep shaping and checking how it stands along the way. It's very light and easy to bend. I made sure the boot was open all the way down to the foot so I could put my hand in. When I started to curl the toe I could no longer insert my hand there.

The boot was filled with just some left over orange mesh or ribbon scraps. Anything to put inside that would help hide any gaps in the finished mesh or ribbon. I wasn't quite sure how I was going to cover the boot but wanted to start with an orange copper metallic wire edge ribbon. This ribbon is very shiny, lightweight and measures 4" x 25 yards. I used orange chenille strips or pipe cleaners to attach the metallic ribbon. The pipe cleaners were cut into thirds.

I started by placing a row of pipe cleaner twists around the top. When placing the pipe cleaners also go through at least two wires of the chicken wire and also use it to stabilize your form when you can (put your twist between two connecting pieces).

Roll off some of the ribbon, but don't cut it. Scrunch together a piece about 2 inches from the end and lay between the pipe cleaner ends.

Make about two twists. Then scrunch about 2-3" and repeat in the next twist. I kept the poufs a little small compared to make a wreath or garland. Continue all around the neck of the boot and don't cut the ribbon.
I placed another row of twists about and inch lower than the first and made a second round. At this point I stopped with the copper metallic ribbon. Cut the ribbon and tuck the raw edge into the inside of the boot and wrap around a wire.

At this point, I realized I needed something to give some weight to the foot of the boot to help it stand upright. I was in the shop, so I had to

make do with anything I could find. I chose 3 rolls of adding machine paper. Removed the mesh, added the paper rolls and tucked the mesh back it. Now, this may not have been the best thing to use as a weight and I'm sure you can come up with something better. A bag of marbles or rocks would have worked.
I decided to wrap the rest of the boot in a 4" metallic ribbon. Same style as the other ribbon, just a different color. Start at the toe. Cover the toe, and while holding the ribbon in place start wrapping the ribbon around. Much like an ace wrap if you've ever wrapped an ankle (drawing from my nursing experience here...).

When I started wrapping the ribbon, I noted that the foot needed more fullness to it. I had crimped the wire together to curl the toe and this had flatten the foot part some. Took tissue paper and just wrapped around the foot for fullness and taped in place. This was a trial project, so that's why I didn't use any glue or anything at this point. Anything I had done like starting the ribbon on the toe, was easily undone and started over.
Continue wrapping the ribbon overlapping your last piece by 1/2 to 1" or so. I did cut the ribbon once I had reached the heel area. Tucked those raw edges and wrapped around a wire and started a new piece to cover the heel.

A square using a double thickness of ribbon was cut and placed over the heel, using a rubber band to hold it in place. Start with a new piece of ribbon on the underneath side close to the rubber band and start wrapping again, continuing up the boot. The boot is lower in the front than in the back so when you can no longer wrap all the way around the boot, just zig-zag back and forth up the rest of the back wrapping the ribbon around wires up under the copper ribbon.

At this point I did use some hot glue. The inside of the boot shows the chicken wire so I used a piece of ribbon and hot glued it to the top edge of the wire to help cover this up. Then re-fluff your copper poufs turning the ends of the pipe cleaners underneath where they don't show.


The boot is now ready for some finishing touches. Along the way, be sure to check the boot to make sure it still stands upright. You may have to adjust here and there. You could add any sort of embellishment.....ribbons, feathers, ornaments, etc. I wanted something to hang off the toe, but I just didn't have the right size ball, jingle bell or anything. I tried hanging a spider off, but finally decided to just leave it plain.

Took a piece of the copper ribbon and folded it in half, hot glued it together and wrapped around the boot, gluing in the back.


Stuck some feather picks that I had down into the band. Made a buckle out of Glitter Strip Garland. Glued it together first, then glued the whole thing to the boot.


The overall measurement of the boot is around 16" in ht. Even though I did open two rolls of ribbon to do this project, I had enough left over the make another boot, just reversing the colors. Chicken wire is easy to work with. The hardest part about this project for me was deciding on the finishing touches! I tried a big spider in place of the buckle and it looked good, but opted to stay with shiny, bling.....I need a BIG jewel to go on the buckle!


